
Introduction
Note
This guide is in progress and will continue to be added to. If the split you're looking for doesn't exist yet then please check back later or feel free to try creating it yourself.
Credit
This guide is based on the guide by Exarion (twitch) here at speedrun.com with permission.
-- This guide is somewhat out of date and doesn't contain the new extended manipulations that are used in the new runs. I'll be trying to add this in the coming days but anyone is welcome to contribute -- - solflare
-
-
Good luck.
-
Hold Up + B + Select to bring up the menu to clear all saved data.
-
After clearing the saved data, navigate to the options.
-
Change Text Speed to Fast
-
Change Battle Animation to Off
-
Don't start the timer until you press New Game!
-
-
-
Simultaneously press A on New Game and start whatever timer you're using.
-
Select New Name and give yourself a one character name; A is usually the fastest selection.
-
Select New Name and give your rival a one character name; A is usually the fastest selection.
-
Single character names are chosen to reduce the amount of text that needs to be scrolled through. If your name were longer then there would be cases where text spoken by NPCs must wrap and cause extra scrolling.
-
-
-
Choose Squirtle and give it a one character name, A is usually the fastest selection.
-
Battle: Rival 1
-
Tail Whip x 1, then Tackle until Bulbasaur faints.
-
If Bulbasaur Growls once, then Tail Whip again before continuing with Tackle.
-
When starting out the main goal is to just win this battle so you can continue practicing. Ideally you'd only have to Tail Whip once or at most twice, otherwise a reset might be in order.
-
-
-
You need to defeat one Pokemon that is encountered between now and when you arrive in Viridian City the second time. After this is done, run from all other encounters.
-
Just Tackle the Pokemon until it faints.
-
This is needed to make sure Squirtle gets level 8 and learns Bubble before Brock.
-
Once your Pokemon's cry is played you can hold Down + Right to have the cursor appear on Run slightly faster.
-
Follow the indicated path through Route 01 and into Viridian City.
-
Go into the PokeMart to pick up Oak's Parcel.
-
Follow this path back on Route 01 and deliver Oak's Parcel to Professor Oak.
-
When delivering the parcel, walk behind Prof. Oak so your rival takes fewer steps in the cutscene.
-
-
-
After receiving the Pokedex from Professor Oak, head towards Viridian City using the same path as before and enter the PokeMart.
-
Don't forget you need to defeat one Pokemon before making it to Viridian City again.
-
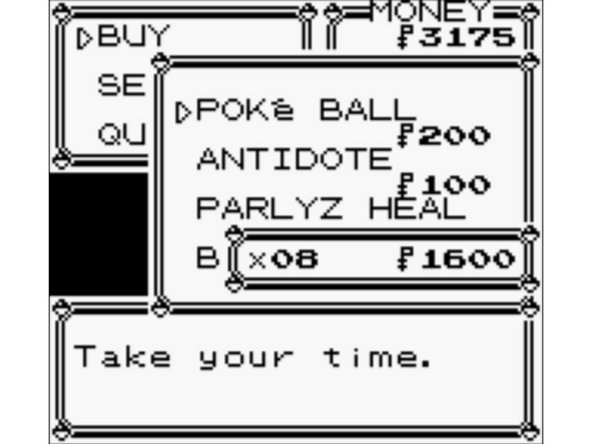
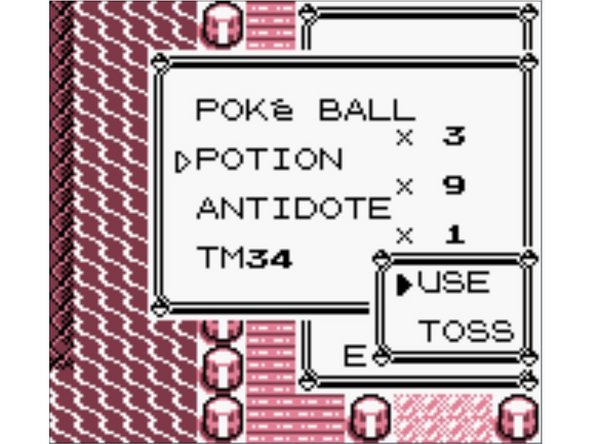
Shopping Trip 1
-
6 - 8 x Poke Ball (1200-1600)
-
The amount of Poke Balls purchased is dependent on how you want to manage your money. 8 is the safest, while 6 can cause a reset if you fail to capture certain Pokemon and run out of balls to catch HM slaves.
-
When starting out 8 is almost always the number you should buy.
-
Save and reset on this tile
-
-
-
RNG manipulate a Lv. 4 male Nidoran encounter by repicating the inputs in this video
-
The manip has a 1/60 chance to produce:
-
a Lv. 4 Rattata on the desired tile
-
no encounter on the desired tile
-
an unrunnable Nidoran (17 HP instead of 18 at Lv. 4)
-
a slightly worse, but still runnable, Nidoran (13 Defense instead of 14 at Lv. 4)
-
If the manip fails, you might have gotten one of the 1/60 chances. Re-save to get a new chance. ---- If the Nidoran breaks out, or you're not confident in throwing the ball perfectly, Tackle it twice before throwing a ball
-
Give the Nidoran a 1-character name and split on exiting the naming screen.
-
-
-
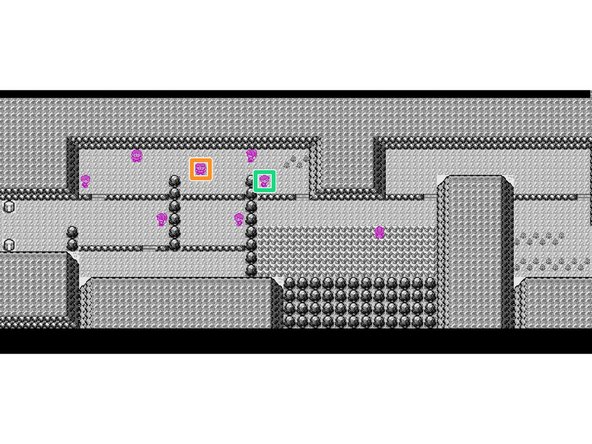
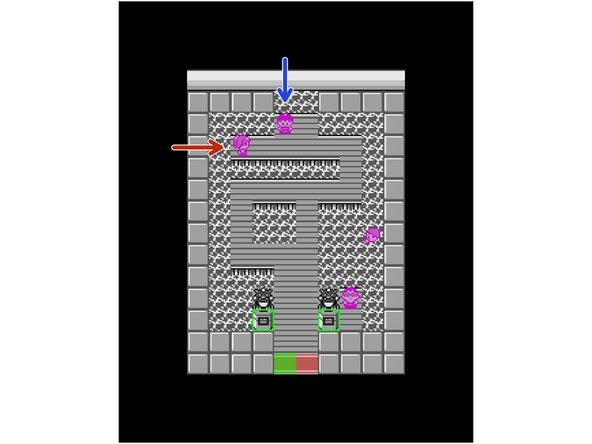
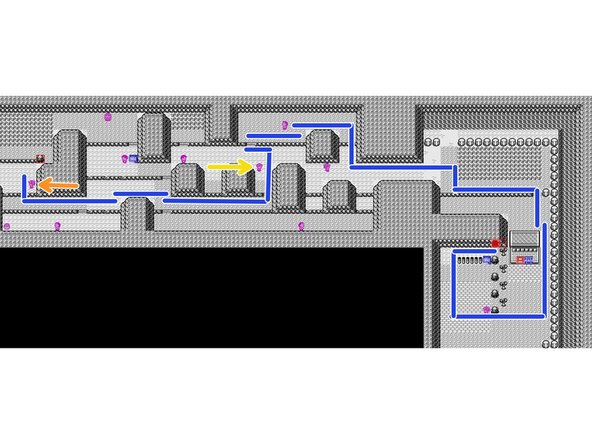
Head North towards Viridion Forest picking up this potion along the way.
-
Follow this path through Viridian Forest. Only red tiles can produce encounters.
-
Pick up this Antidote.
-
Pick up this hidden Potion.
-
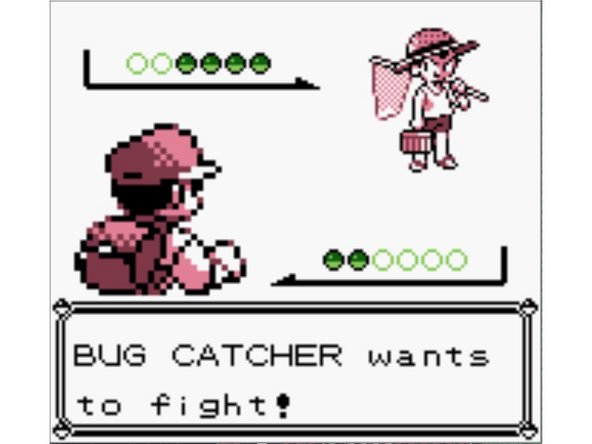
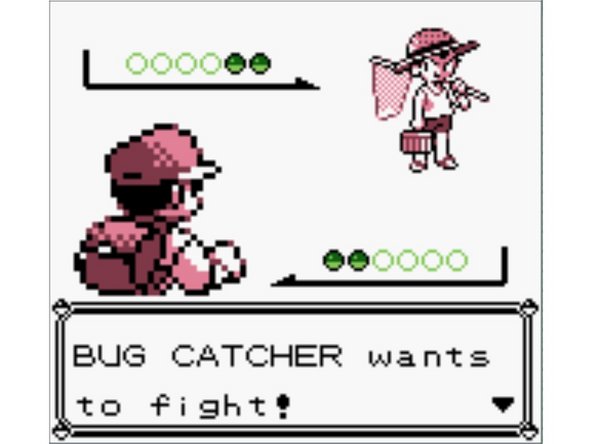
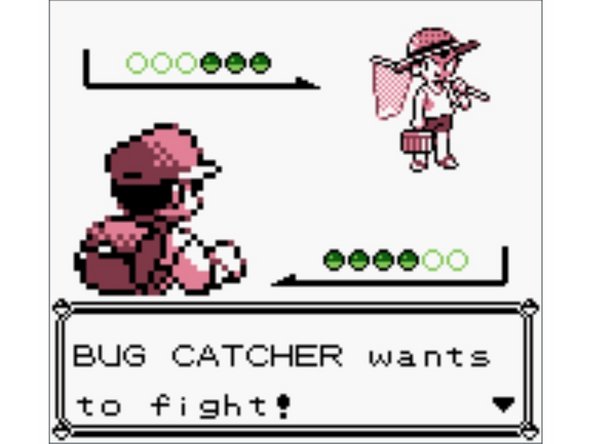
Battle: Bug Catcher
-
Tail whip x 2, Tackle x 4-6
-
If you get poisoned, wait until after the fight to use the Antidote. If you fall below 7 HP, use a Potion.
-
After the fight switch Nidoran to the front, heal Squirtle to 17+ HP, and heal poison if necessary. Head straight towards Pewter Gym.
-
-
-
When practicing you may want to save before Brock.
-
Battle: Brock
-
Immediately switch to Squirtle.
-
Geodude: Bubble x 2-3 and switch to Nidoran after.
-
Switch to Squirtle.
-
Onix: Bubble x 2-3.
-
If Onix uses Bide on the turn you switch to Squirtle, use Tail Whip twice then Bubble
-
Split on leaving the battle screen with Brock.
-
-
-
Go to the PokeMart
-
Change the battle style option from SHIFT to SET.
-
Shopping Trip 2
-
8 x Potion (2400)
-
Head on towards Route 3.
-
-
-
You need to use one fewer Horn Attack than is listed in the remaining battles of this split, so finish enemies with Tackle when it will kill.
-
Battle: Bug Catcher 1
-
Leer + Horn Attack + Horn Attack on all three.
-
Heal to full. (If you're still practicing it's a good idea to save before Youngster).
-
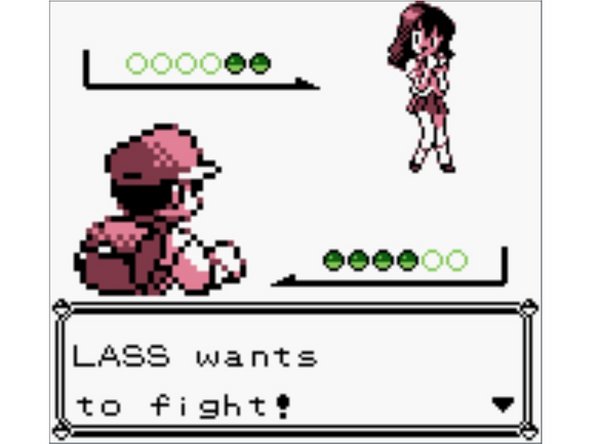
Battle: Youngster
-
Leer + Horn Attack + Horn Attack on both.
-
Quick Attack does 8-10 damage (13-16 critical, or after a Tail Whip).
-
Wrap does 3 damage (4 critical, or after a Tail Whip)
-
-
-
Don't forget to save a Horn Attack if you haven't yet.
-
Fight the Bug Catcher below, not the Lass above.
-
Battle: Bug Catcher 2
-
At the start of this battle, swap Horn Attack with Leer. (Press Select on Leer then again on Horn Attack)
-
2 x Horn Attack, 3 x Horn Attack, 2 x Horn Attack, 3 x Horn Attack.
-
Battle: Bug Catcher 3
-
2 x Horn Attack, 4 x Horn Attack.
-
-
-
Follow this path behind the Lass and towards the Pokemon Center.
-
Catch a Spearow or a Pidgey in one of the grass patches ahead.
-
Use Poison Sting to weaken Lv. 5 Spearows, Horn Attack to weaken Lv. 8 Pidgeys and Tackle to weaken everything else.'
-
This will be the Pokemon you will teach Fly to.
-
Heal at the center before entering Mt. Moon. (Split on entering)
-
-
-
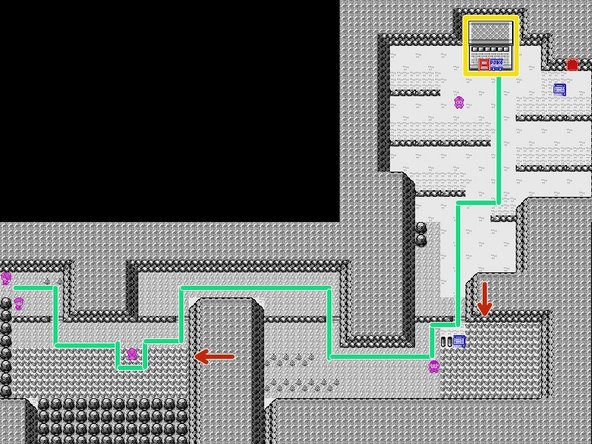
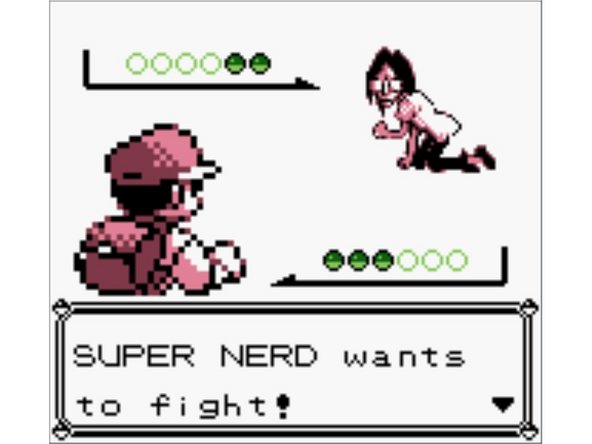
Follow this path and battle the Super Nerd.
-
Battle: Super Nerd 1
-
2 x Horn Attack + Poison Sting, 2 x Horn Attack (+ Poison Sting)
-
Follow this path to battle the Lass.
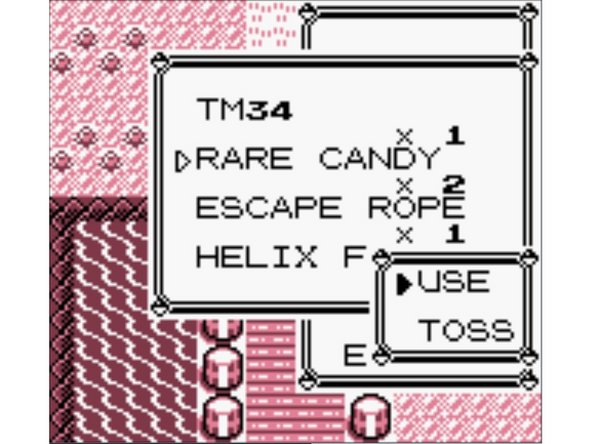
-
Pick up the Rare Candy and Escape Rope along the way.
-
Battle: Lass
-
2 x Horn Attack, 2 x Horn Attack
-
Move to this tile, save, and hard reset.
-
-
-
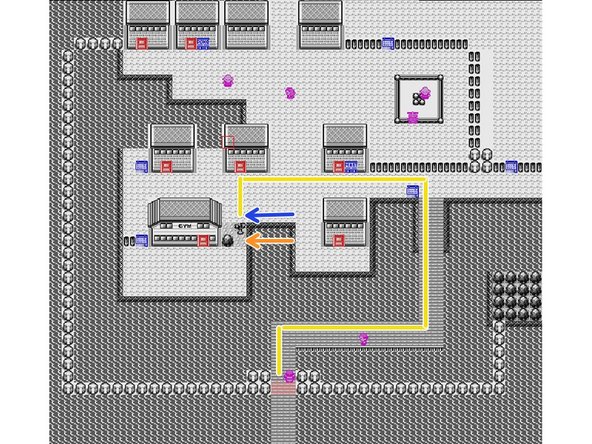
RNG manipulate a Paras encounter by replicating the inputs in this video.
-
The manip:
-
has a 7/60 chance to produce a bad early encounter (meaning you won't get the Paras)
-
has a 1/60 chance to produce an early Paras (you should weaken this one since you won't get the normal one)
-
has a 1/60 chance to produce a Paras on the desired tile that does not get in the ball with the perfectly executed inputs
-
If the Paras breaks out or you're not confident in throwing the ball perfectly, Horn Attack it once before throwing a ball.
-
If the manip fails, it might have been due to RNG. You can either continue as normal and perform a backup Paras manip at the end of Mt. Moon, or re-save to get a new chance.
-
-
-
Use the Moon Stone you got during the Paras RNG manip to evolve into Nidoking before Rocket.
-
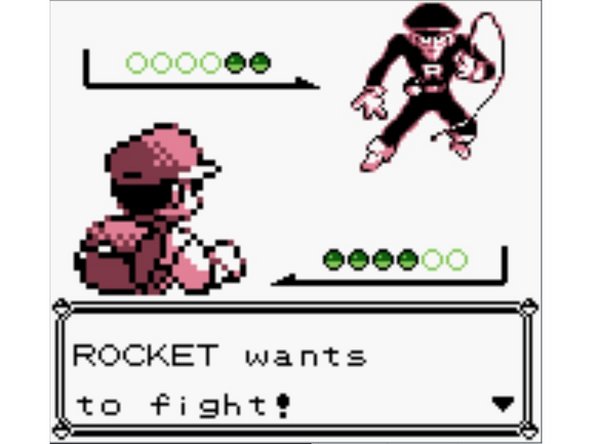
Battle: Rocket
-
Horn Attack + Poison Sting, 2 x Horn Attack
-
Battle: Super Nerd 2
-
2 x Horn Attack, Horn Attack + Poison Sting, 2 x Horn Attack (+ Horn Attack)
-
Choose the Helix Fossil.
-
-
-
If you don't have a Paras, use this backup RNG manipulation.
-
This Paras does not get in the ball with perfect inputs so you should Horn Attack it first.
-
Split on exiting Mt. Moon.
-
-
-
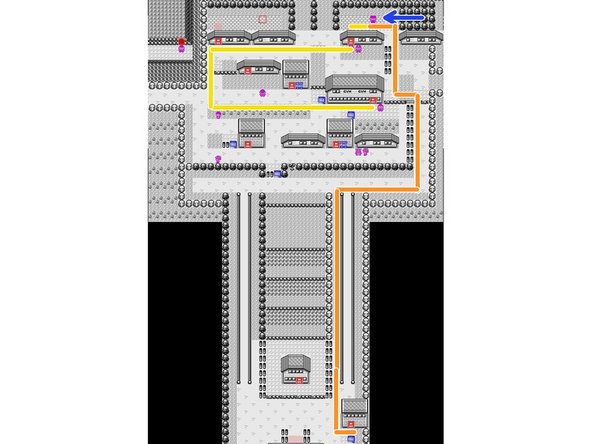
Walk through Route 4 towards Cerulean City.
-
Heal at the Pokemon Center.
-
Pick up the hidden Rare Candy here.
-
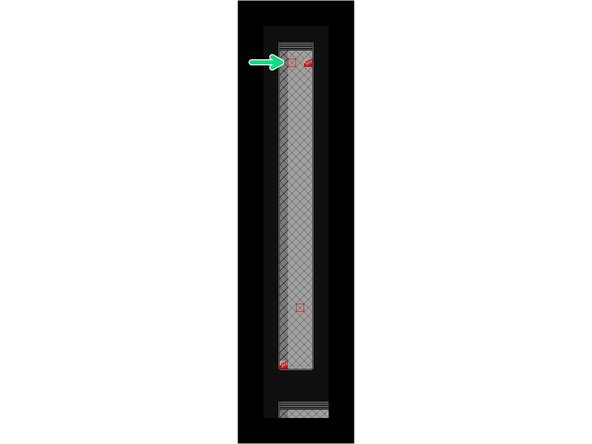
Head towards Nugget Bridge and the second Rival fight.
-
Battle: Rival 2
-
Horn Attack x 3 / Horn Attack / Horn Attack + Poison Sting / Horn Attack x 2 (+ Horn Attack)
-
If you get Sand-Attack-ed switch to your flier and let it die.
-
-
-
Battle: Bug Catcher
-
Horn Attack + Poison Sting / Horn Attack (+ Poison Sting)
-
Battle: Lass 1
-
Horn Attack + Poison Sting / Horn Attack x 2
-
Stay in if Sand-Attack-ed.
-
Heal to 12+ HP
-
-
-
Battle: Youngster
-
Horn Attack (+ Poison Sting) / Horn Attack (+ Poison Sting) / Horn Attack
-
Battle: Lass 2
-
Horn Attack + Poison Sting / Horn Attack x 2
-
Heal to 15+ HP
-
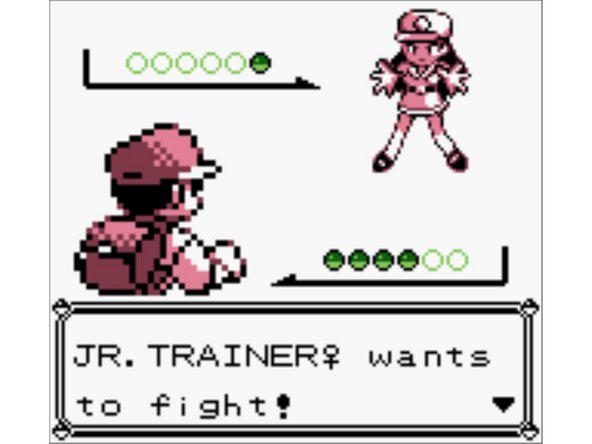
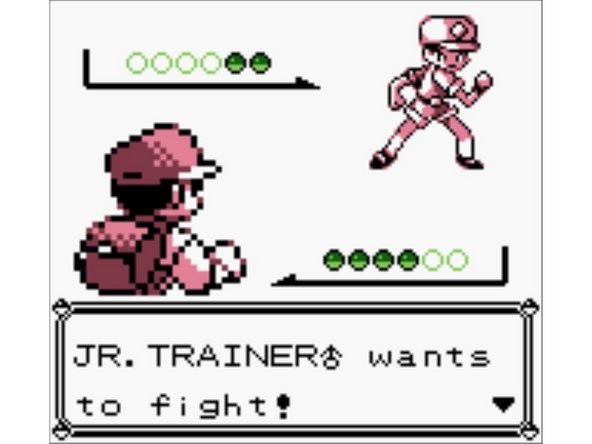
Battle: Jr. Trainer
-
Horn Attack x 2
-
-
-
Use 2 Rare Candy to reach Lv. 23.
-
Teach Thrash over Tackle.
-
Battle: Rocket
-
Thrash
-
Split after the battle with Rocket ends.
-
-
-
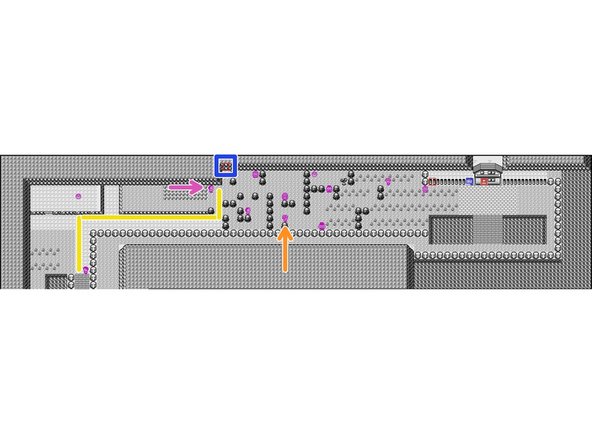
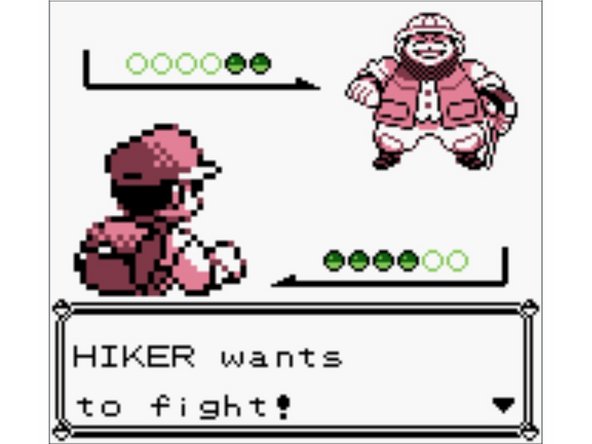
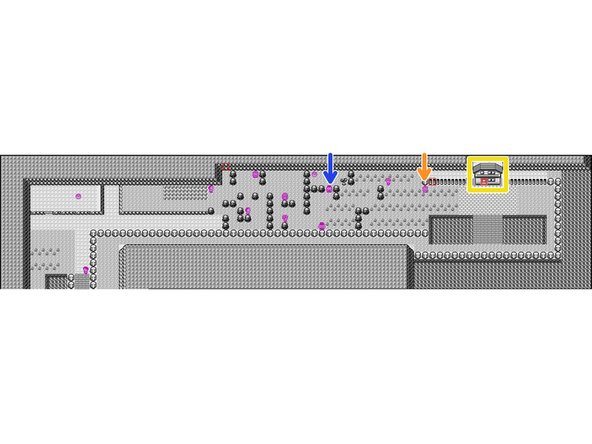
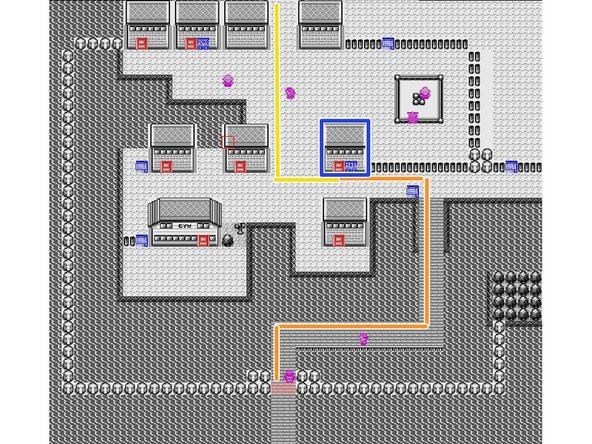
Make your way to Route 25 and fight the top Hiker.
-
Battle: Hiker
-
Thrash
-
If confused and below 23 HP, finish Geodue with Squirtle.
-
Get the hidden Elixir here.
-
Battle: Lass
-
Thrash
-
-
-
Fight the Jr. Trainer above rather than the Hiker.
-
Battle: Jr. Trainer
-
Thrash
-
Battle: Lass 2
-
Thrash
-
Say yes to Bill, heal to 70+ HP, and Escape Rope back to Cerulean City.
-
If you're low on Potions, healing to ~45 HP is fine, but Misty is an 80% win instead of 95%.
-
-
-
Battle: Jr. Trainer
-
Thrash
-
You may want to save before Misty.
-
Battle: Misty
-
Thrash
-
If you get confused, sacrifice your flier. If your flier is dead, sacrifice Paras.
-
Split after exiting the battle.
-
-
-
Walk through the Dig house to fight the Rocket.
-
Battle: Rocket
-
Thrash
-
Head south on Route 5 towards the Underground Path.
-
Pick up the hidden Full Restore here on your way through.
-
-
-
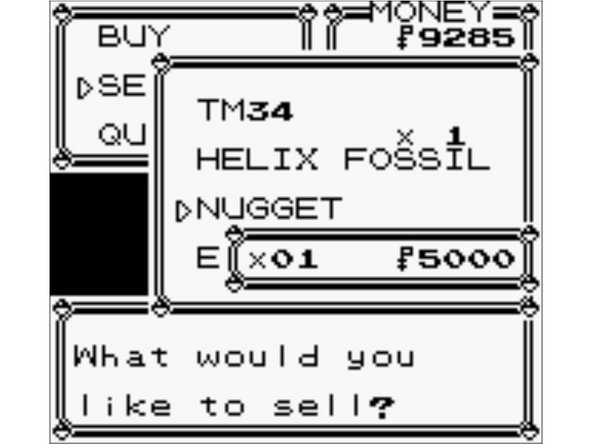
Go to the PokeMart.
-
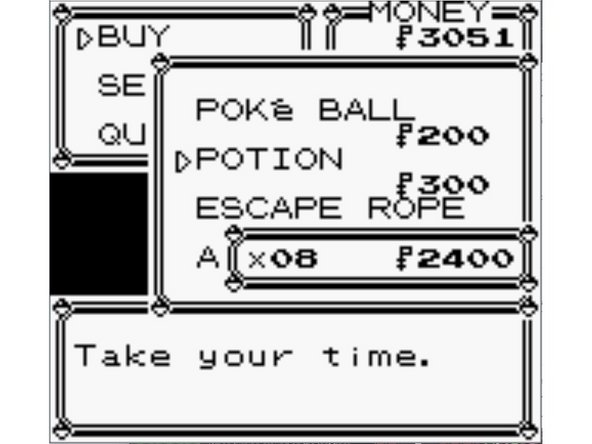
Shopping Trip 3
-
Sell: Nugget
-
Sell: TM34 if you have your Antidote
-
Buy: 3 x Repel (1050)
-
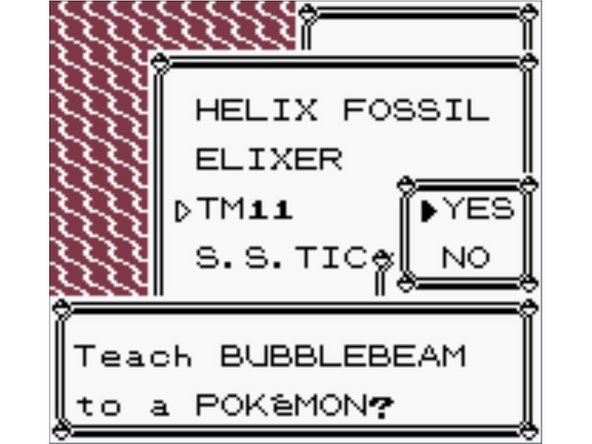
Go to the S.S. Anne.
-
Heal to 35+ HP
-
Teach Bubblebeam (TM11) over Poison Sting.
-
-
-
Take the left stairs, then go down and right to meet your rival.
-
Battle: Rival 3
-
Horn Attack + Bubblebeam / Bubblebeam x 2 / Thrash
-
If you get Sand-Attack-ed, sacrifice your weakest HM slave.
-
Get HM01 (Cut) from the captain.
-
Leave the S.S. Anne and head to the gym.
-
-
-
On the tile before the Cut bush:
-
Heal to 25+ HP
-
Swap your slot 1 item with Repel.
-
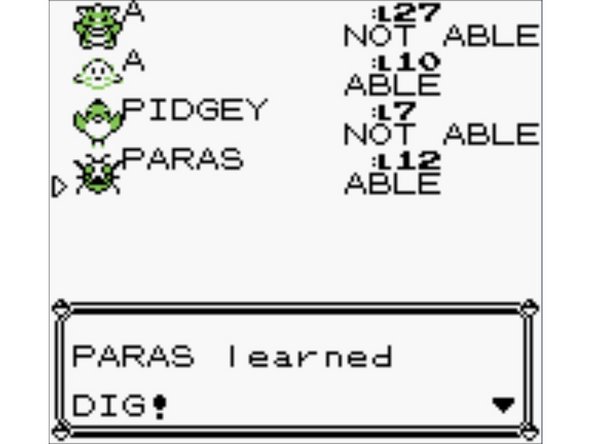
Teach HM01 (Cut) to Paras.
-
Teach TM28 (Dig) to Paras.
-
Cut the bush and save on the tile here.
-
-
-
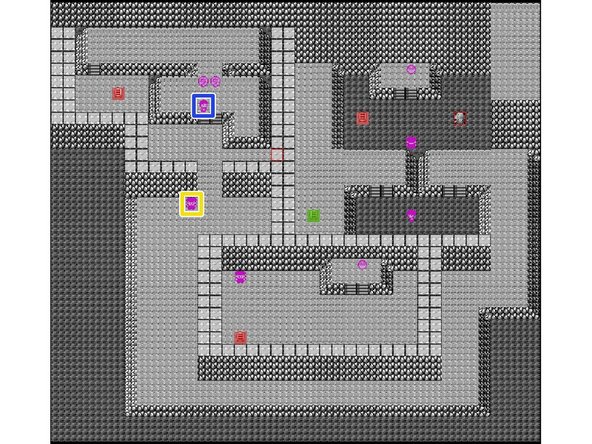
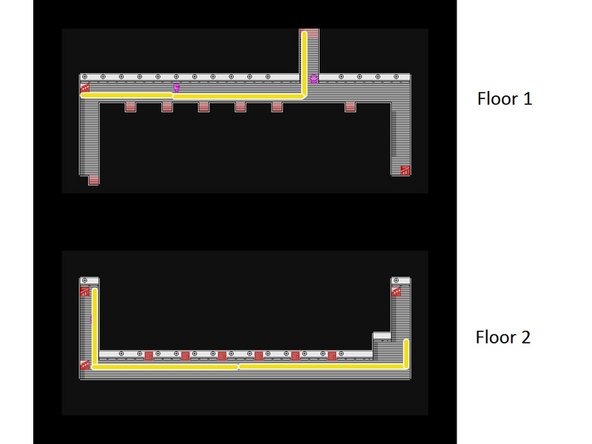
RNG manipulate the trash cans puzzle by replicating the inputs in this video.
-
The manip has a 3/60 chance to fail.
-
You don't need to be frame perfect after talking to the first can.
-
If the manip fails, use the image in the following step to solve the puzzle normally.
-
-
-
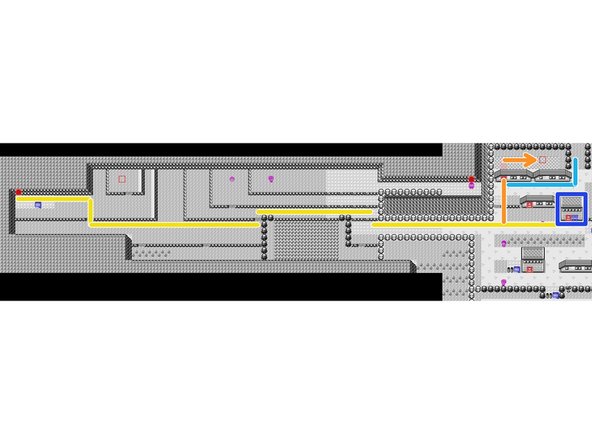
If the RNG manipulation in the previous step failed then follow the guide shown in the image.
-
Battle: Lt. Surge
-
Horn Attack + Bubblebeam / Thrash
-
Split after exiting the battle.
-
-
-
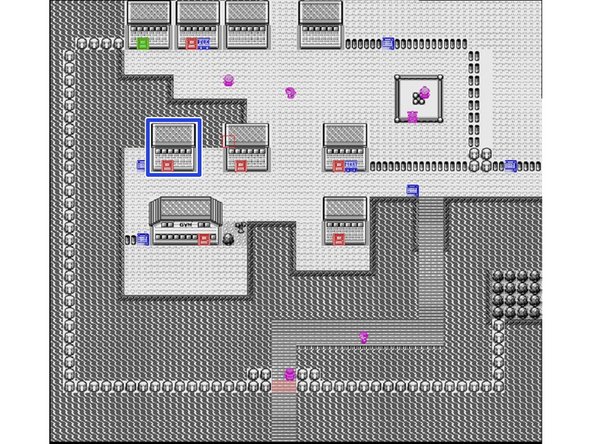
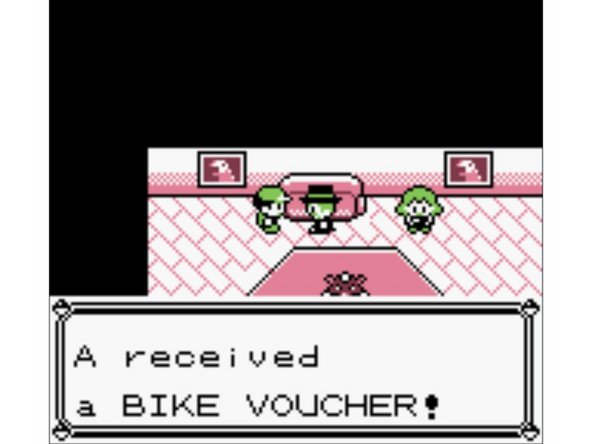
Go to the house above the Vermillion City gym and talk to the chair of the fan club to get the Bike Voucher.
-
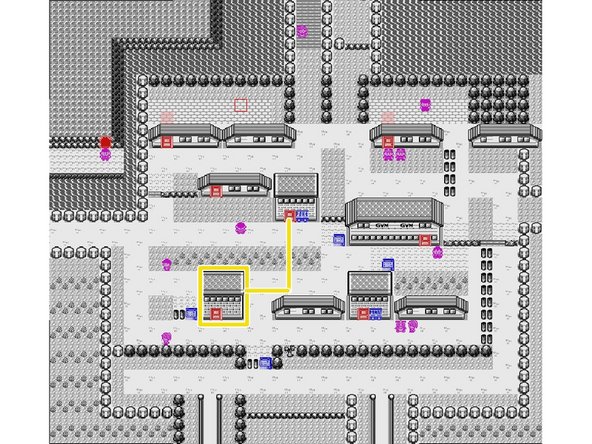
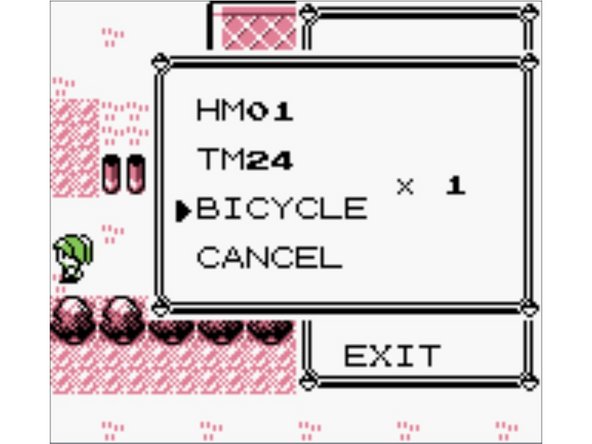
Dig back to Cerulean and get the Bicycle from the bike shop.
-
-
-
After leaving the shop:
-
Swap your slot 2 item with the Bicycle.
-
Teach TM24 Thunderbolt over Leer.
-
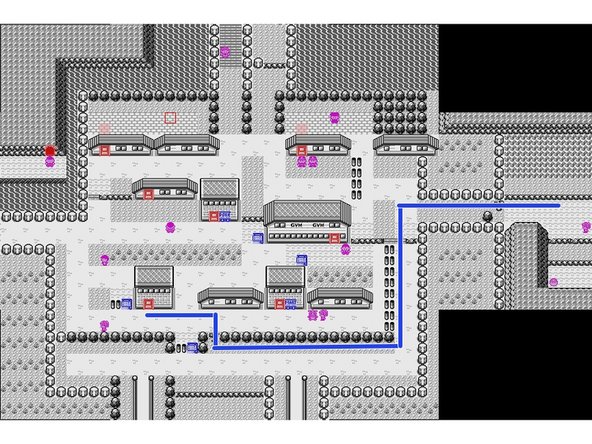
Get on the bike and head to Route 9, cutting the two bushes in your way.
-
-
-
Head down Route 9 towards Rock Tunnel.
-
Battle: Jr. Trainer
-
Thrash
-
If you get confused and are at low HP, switch to your weakest slave, then immediately back to Nidoking.
-
Battle: Bug Catcher
-
Thrash
-


Cancel: I did not complete this guide.
10 other people completed this guide.
